You can make delicious homemade pies, galettes, turnovers or other pastries with my easy pie crust recipe by hand using simple ingredients. Making a flaky pie crust couldn’t be any easier with my step by step tutorial.
Today I am sharing how to make pie dough recipe by hand that you can use in your delicious sweet and savory pastry recipes.
I use this all-butter pie dough in my apple blueberry pie.
Here I share all the information you need to make a perfect pie crust, and how to bake it depending on the recipe. You’ll find all the tips you need to make a delicious pie crust every single time.
Ingredients you’ll need
You can find the exact quantities at the bottom of my post, in the recipe card.
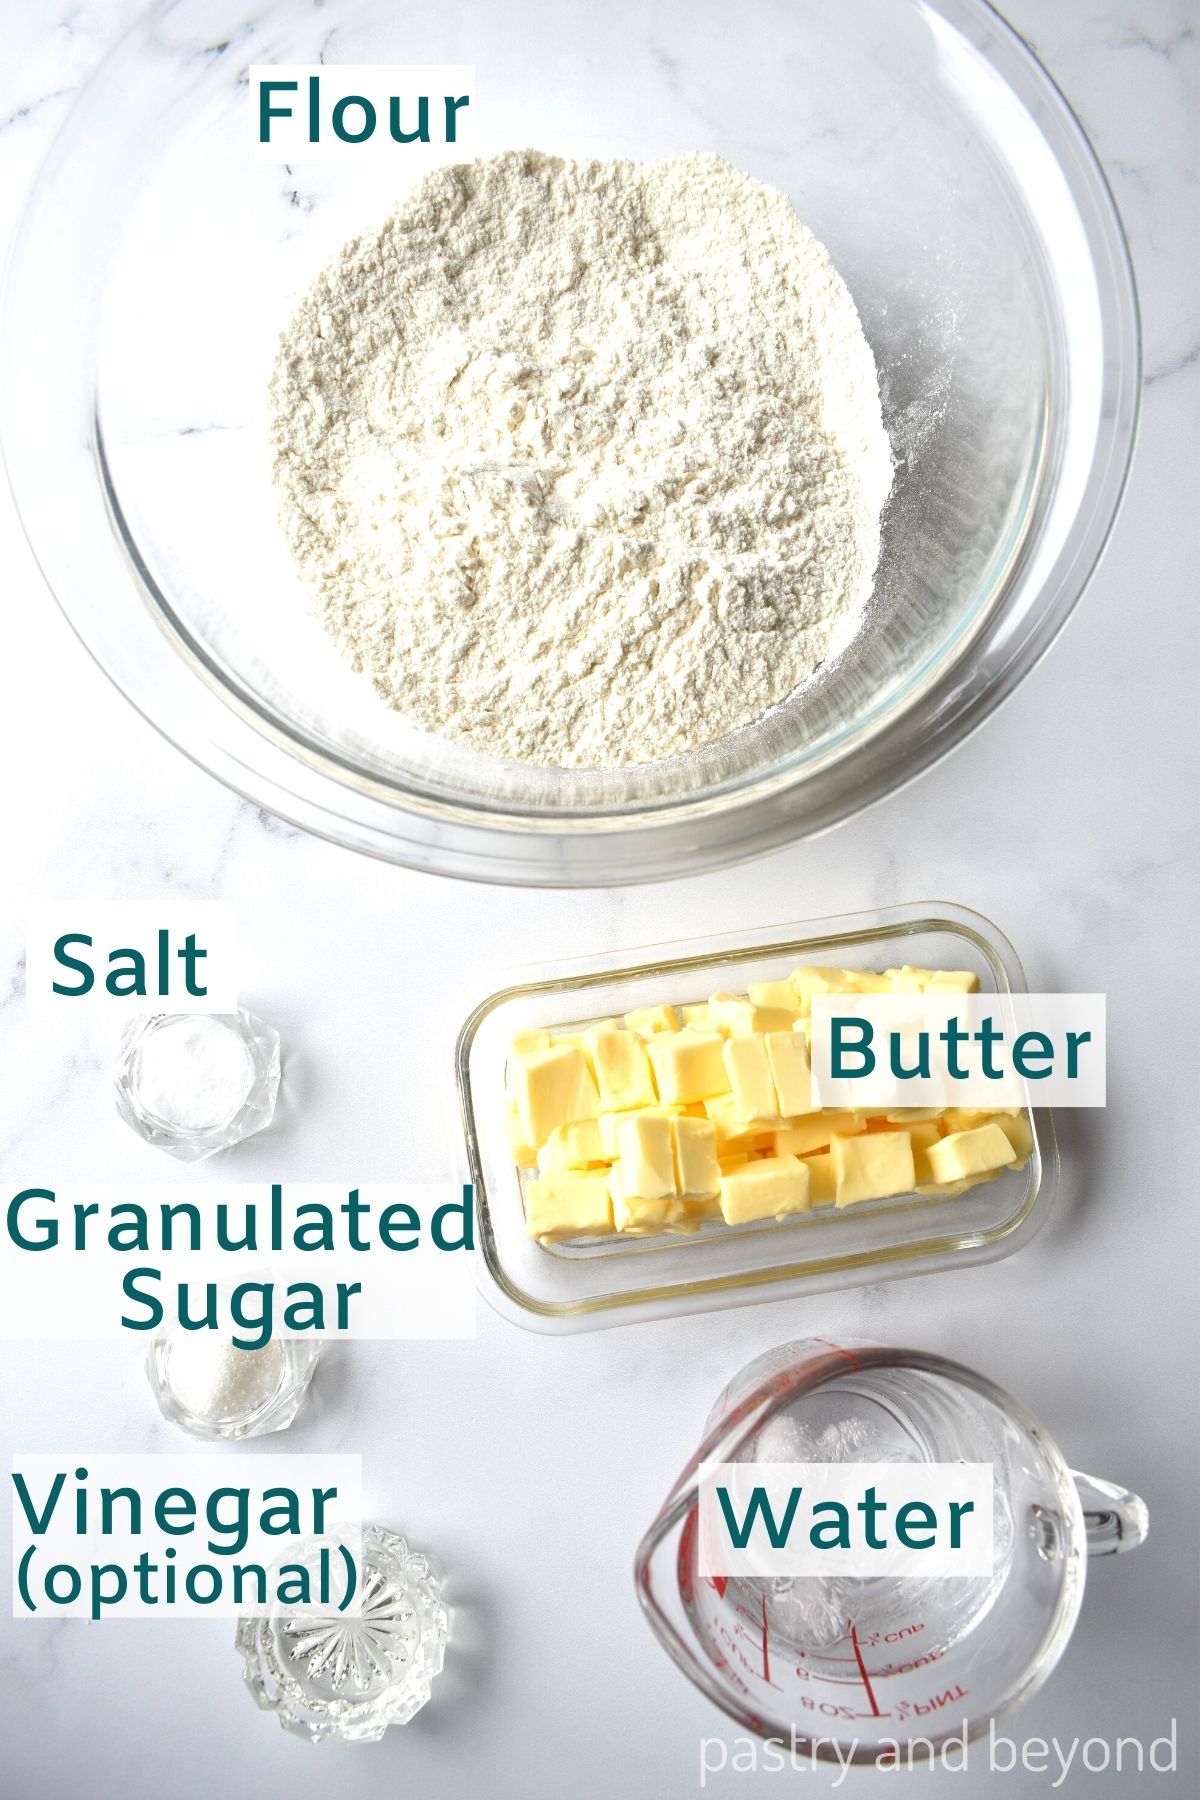
- All-purpose flour-It gives structure to the pie crust.
- Butter-It should be cold butter so that we get flaky layers. You may remember that we use cold butter to make quick puff pastry as well. When we put the dough into the preheated oven, the water in the cold butter starts to evaporate and creates flaky layers. So butter should be cold.
- Water-It brings the dough together. It should be ice water so it won’t warm the mixture. If the water is ice cold/very cold, you don’t need to add ice but it is not that cold, adding ice to the water is a must.
- Salt-It gives flavor.
- Sugar-I use a little sugar to give flavor as well.
- Vinegar-This is optional because I made this recipe with and without vinegar and this pie crust was flaky each time. But when I want to make a crisp pastry, my grandmother advises me to add some vinegar. I recently started to hear that vinegar stops gluten development and creates a soft dough. As this will help you not to overwork the dough, I recommend you use it.
Important tips
Before I continue with instructions, I want to mention what we are doing and why so when you read the step-by-step notes, it will flow easily.
- Don’t overwork the dough: When we make pie crust, we want flaky layers so we don’t want any gluten development. Gluten is a protein in the flour. When we add water to the flour mixture, the more we work with the dough, the more gluten forms and make the dough elastic. We want gluten development when we make bread. But when we make a pie crust, we don’t want to overwork the dough and activate the gluten so can have flaky layers. Overworking dough will give a tough dough and make the dough shrink as it bakes so make sure to avoid overworking.
- Add water gradually: We add the water gradually because even the same type of flour can absorb different amounts of liquid. We avoid adding excess water. When you try bringing the dough together with your hands, it should easily come together, it should be moist(this sign is very important to understand the consistency) but not wet. If we add too much water, then we’ll want to add excess flour which will result in overworking the dough and potentially losing the flaky layers. At the same time, I should say that we should make sure that there is enough water, if not the dough will break easily while rolling out.
- Keeping the dough cold: It is important to keep the dough cold from the beginning by using cold butter and cold water till placing the crust to the oven. We should rest the dough in the fridge before rolling it out. These steps will avoid shrinking the dough while rolling it out. The dough should also be cold before it is in the oven because the water in the cold butter will start to evaporate and create flaky layers. If the dough is warm, the butter will melt and there won’t be any flakiness. So after rolling out, keep the dough in the fridge as needed. It can be anywhere between 30 minutes to 1 hour.
Step by step instructions
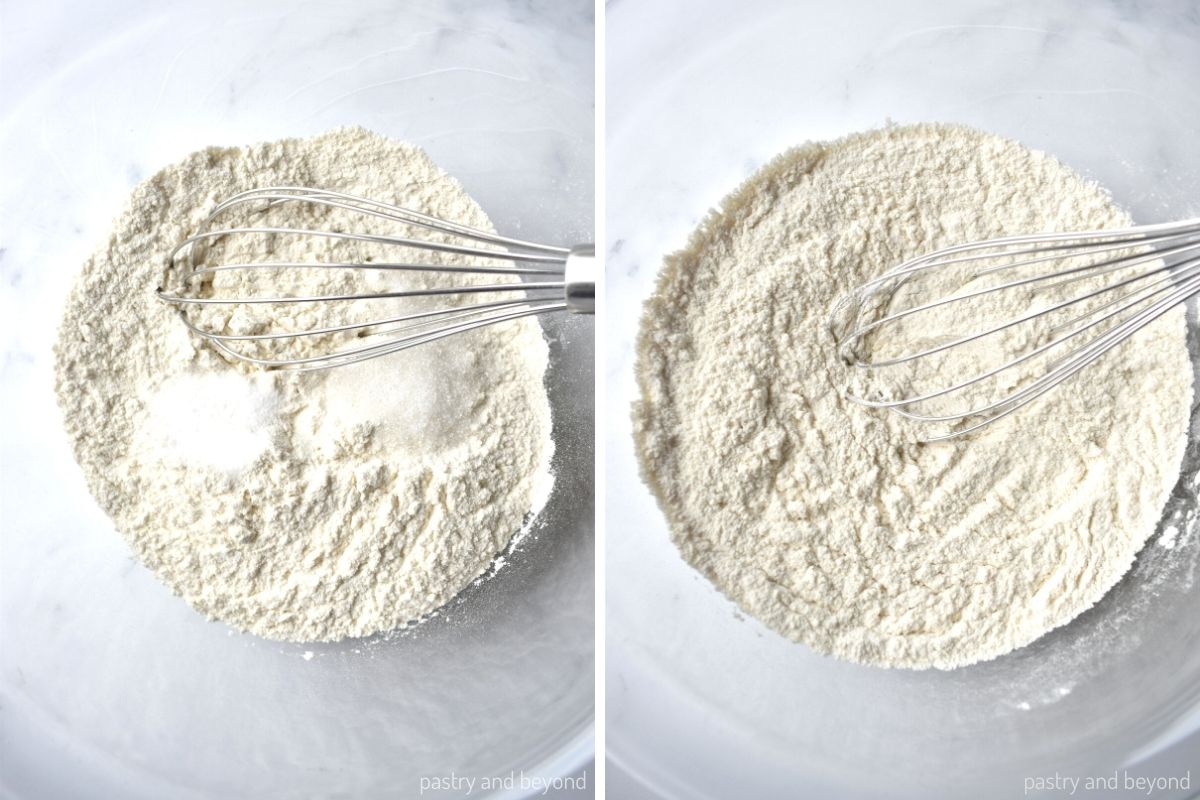
First I place the flour, salt and sugar in a large bowl and stir with a whisk.
Next I add the cubed cold butter pieces and cover the pieces with flour mixture so I cut the butter into the flour mixture easily.
If you are working in a hot environment, I suggest you keep the bowl with flour mixture and butter in the freezer for 15 minutes just as I did in my quick puff pastry recipe.
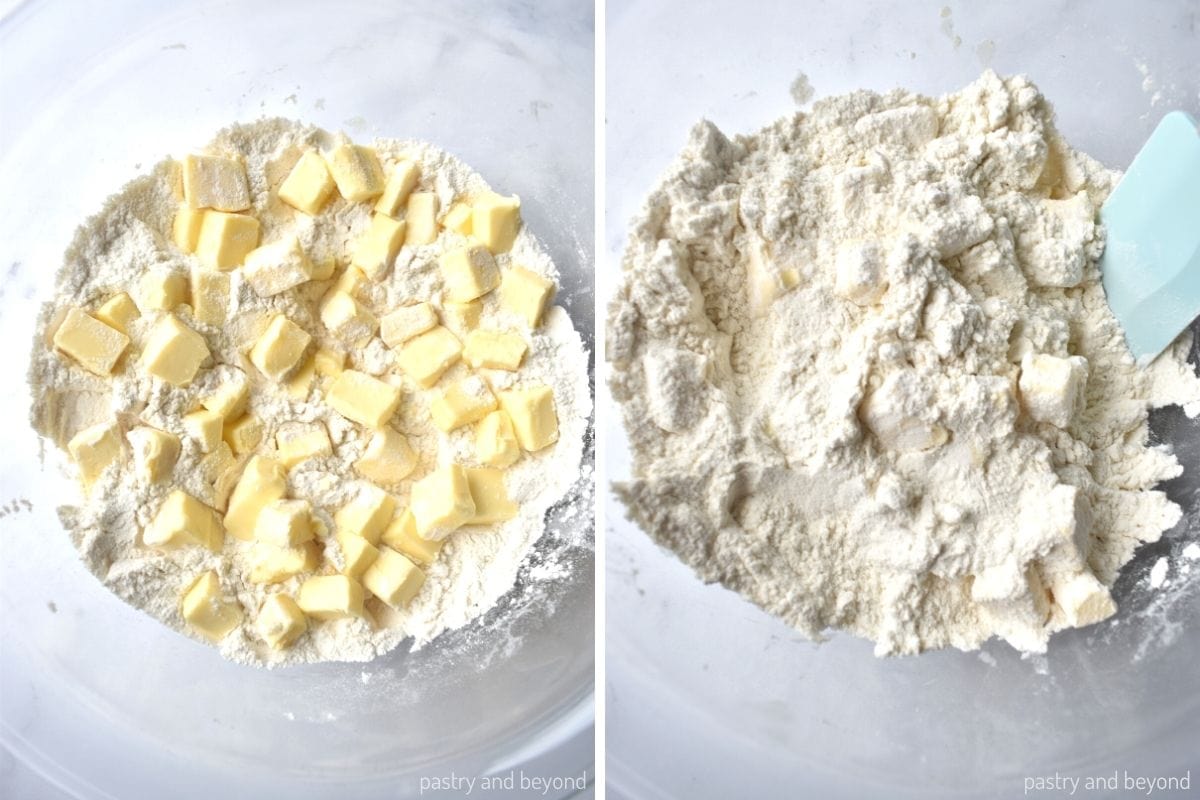
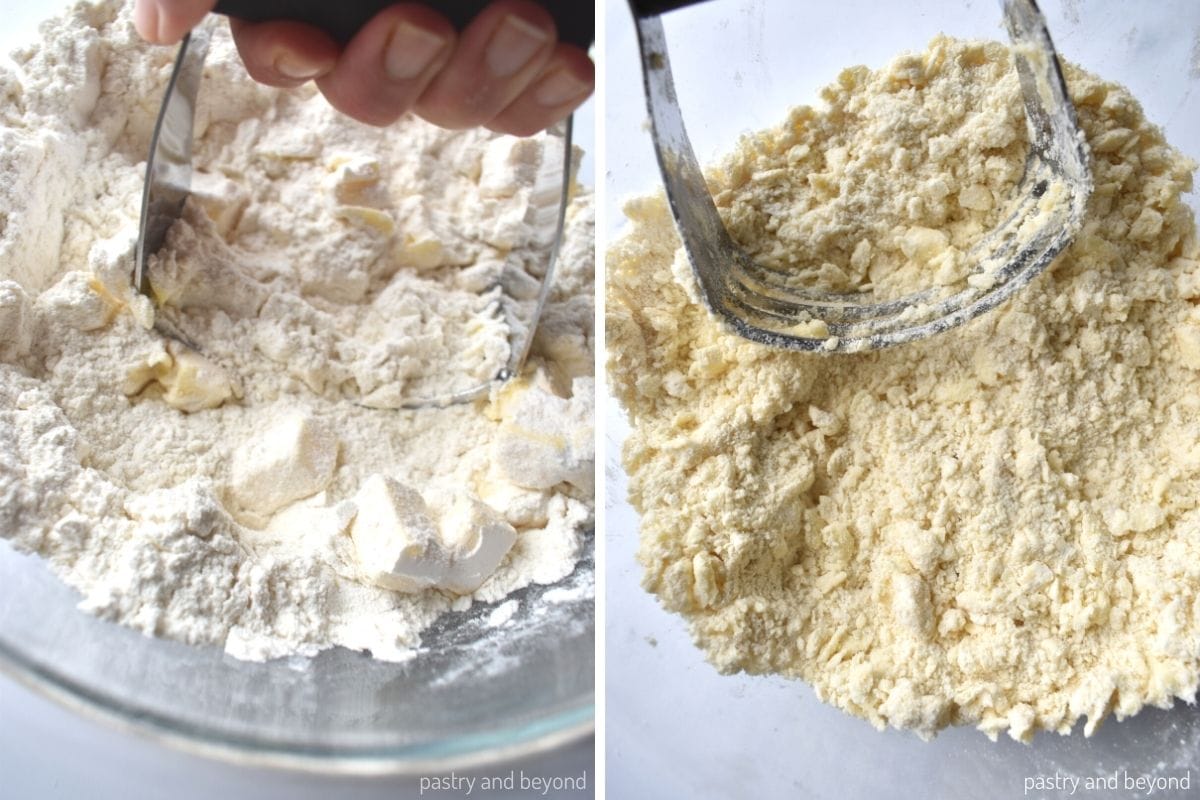
I prefer using a pastry cutter but you can use a fork or 2 forks for this process if you don’t have one.
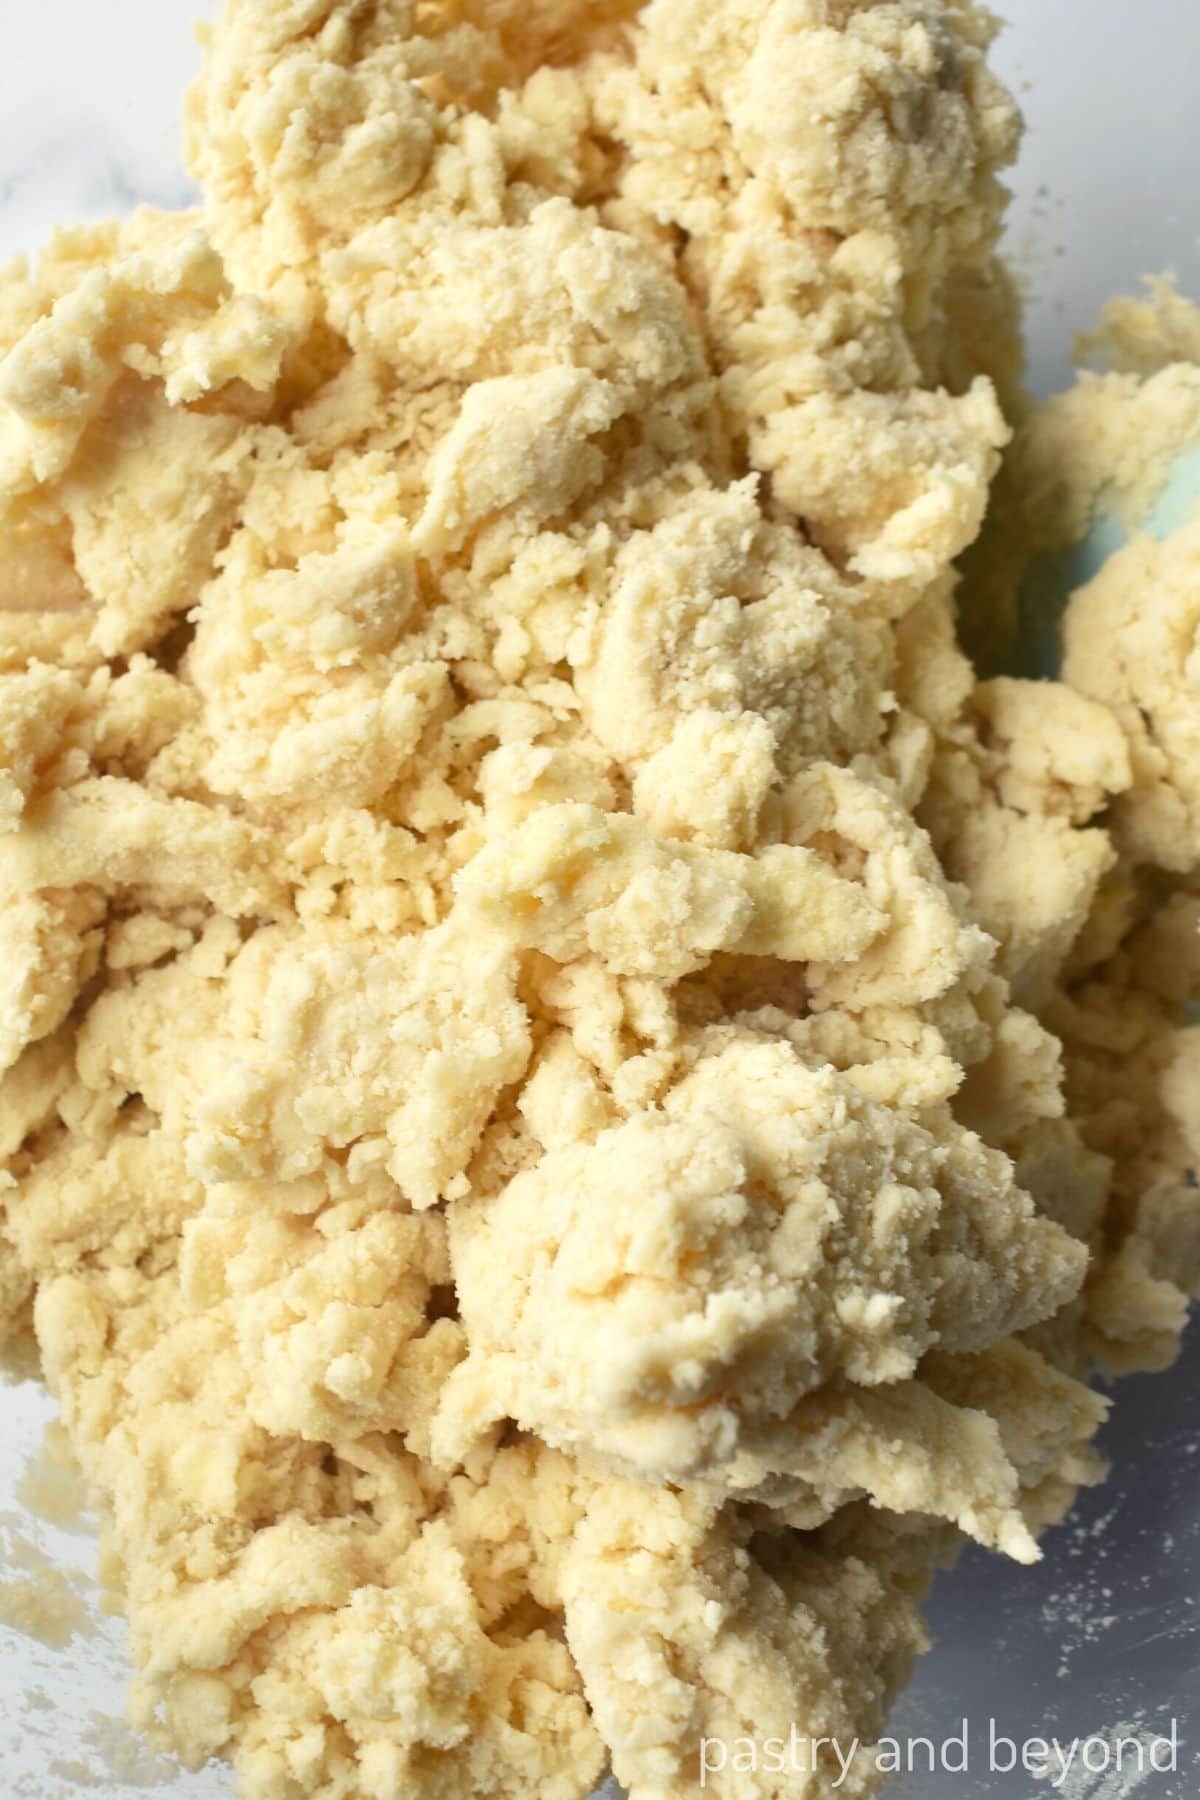
We are aiming for pea-size pieces. You’ll notice some large pieces of butter which is fine.
I add 3 tablespoons of water and whole vinegar into the flour mixture and stir with a spatula. Then I continue to add water gradually as needed using 1 tablespoon of water at a time.
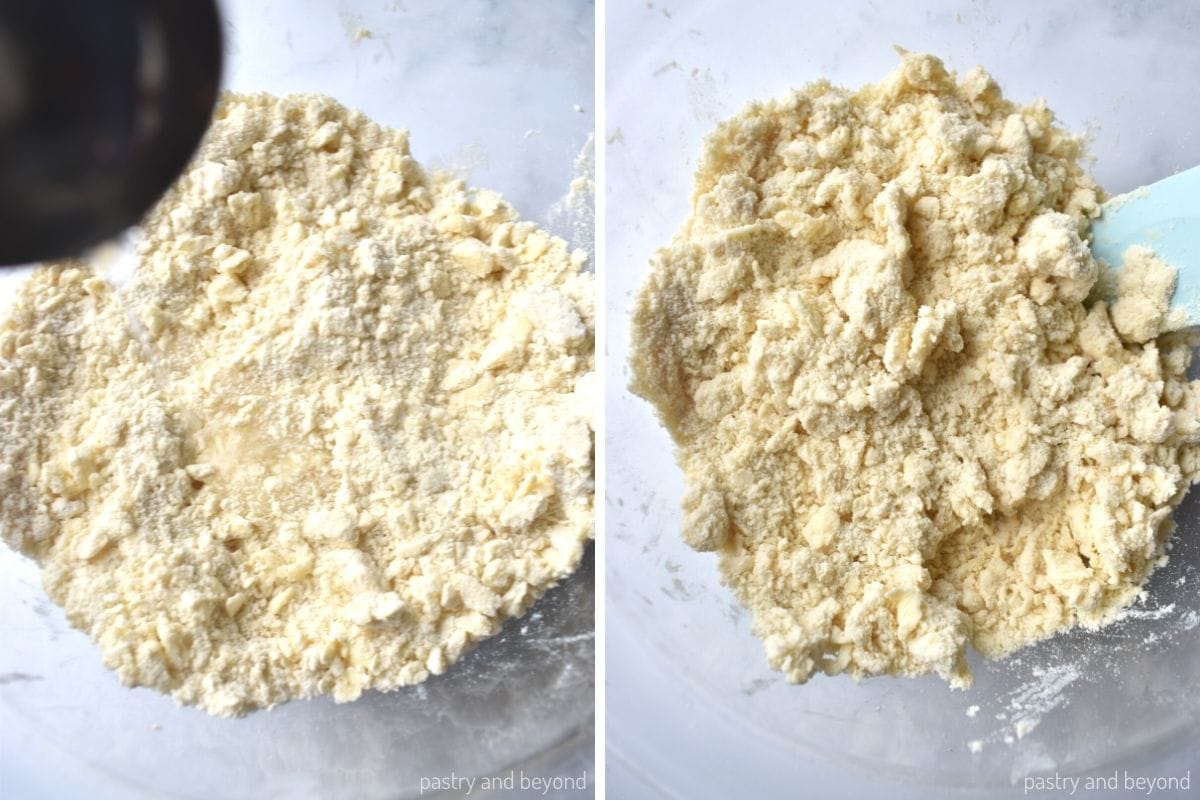
When the dough is moist, makes lumps and the dough comes together, I stop adding water. I use 7 to 9 tablespoons of liquid(a mixture of water+vinegar).
If you find the dough a little wet, add a little flour. You should avoid adding an unnecessary amount of flour and water as this will make the dough tough.
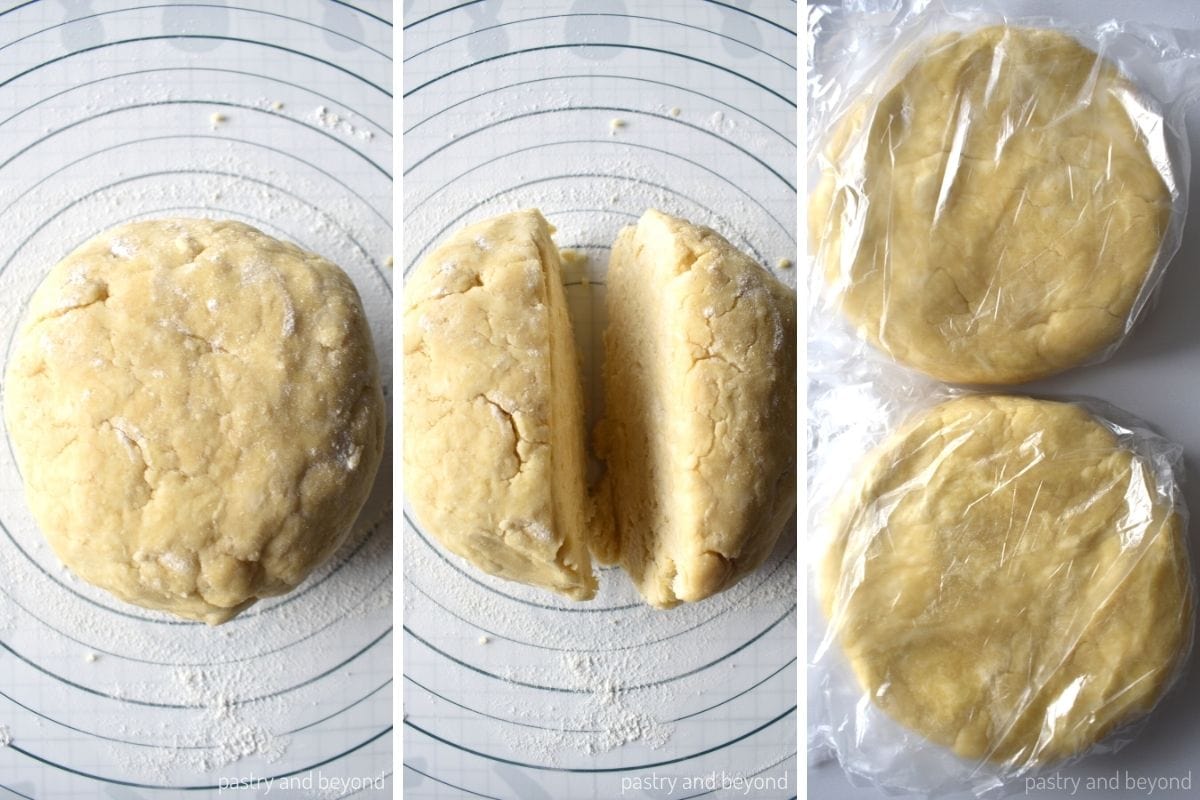
I gently make a ball out of the dough without overworking it. Then I place it on a lightly floured surface, divide the dough in half, make discs and cover them with plastic wrap.
I let them rest in the fridge for an hour before rolling them out.
If you’ll use this recipe in a double-crust pie, remove each dough once you are ready to work with it to keep the dough cold.
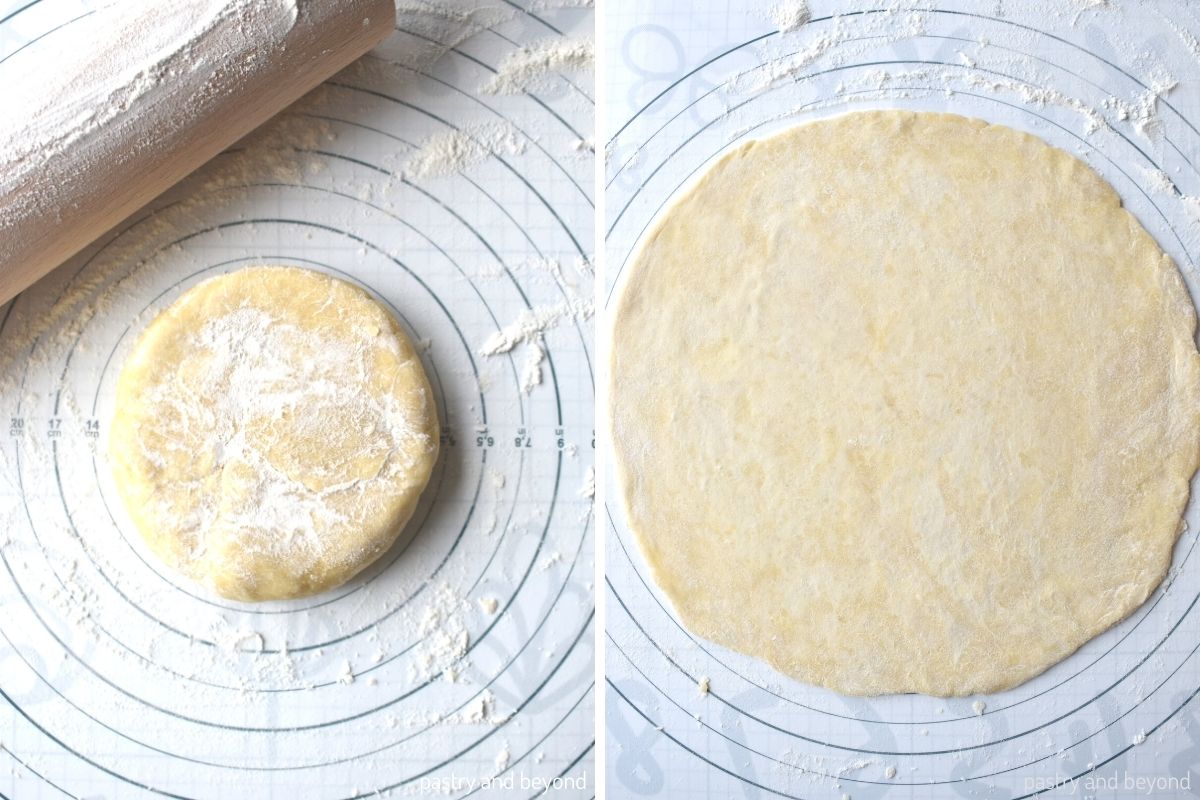
I either use parchment paper or a silicone pastry mat with measurements (the one I am using now) while rolling the dough.
First I flour the work surface, rolling pin and the dough so the dough doesn’t stick to either.
Then I gently start to roll out the dough. I give a quarter turn to the dough so it doesn’t stick to the surface.
I roll the dough into 12 inch(30cm) circle.
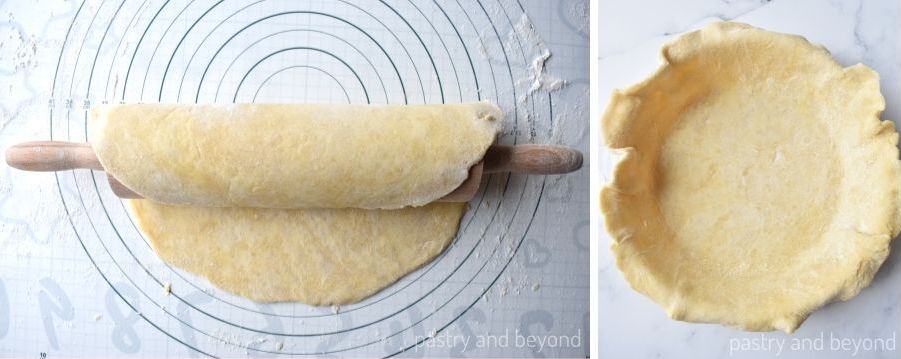
Then I lightly flour the rolling pin and loosely roll the dough around it and gently unroll it into the 9 inch (23cm) pie plate just like I do in my tart crust recipe.
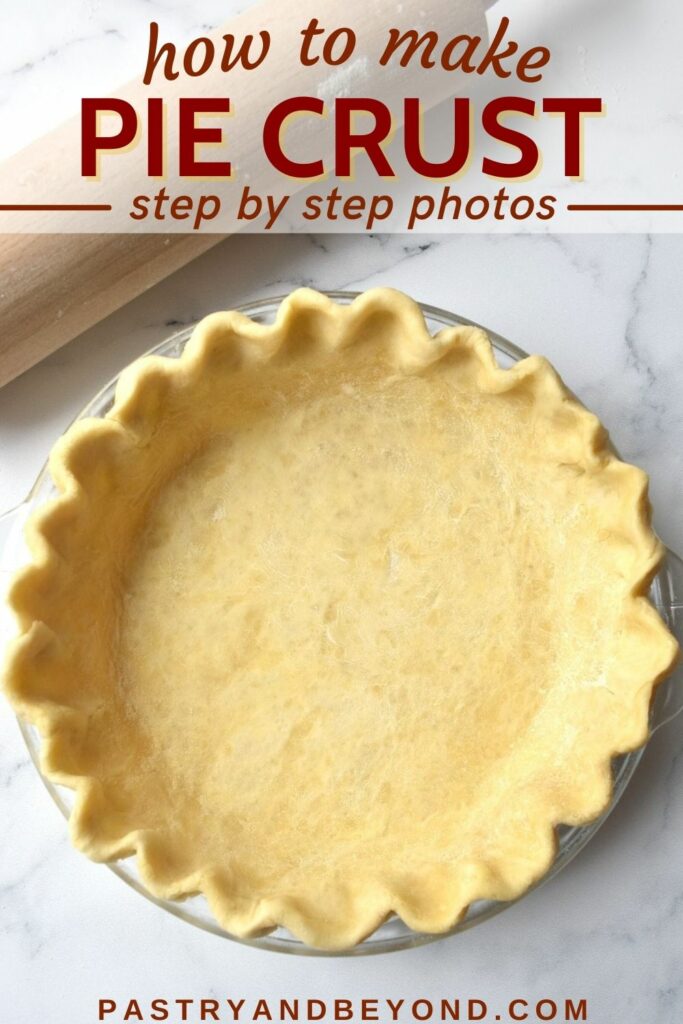
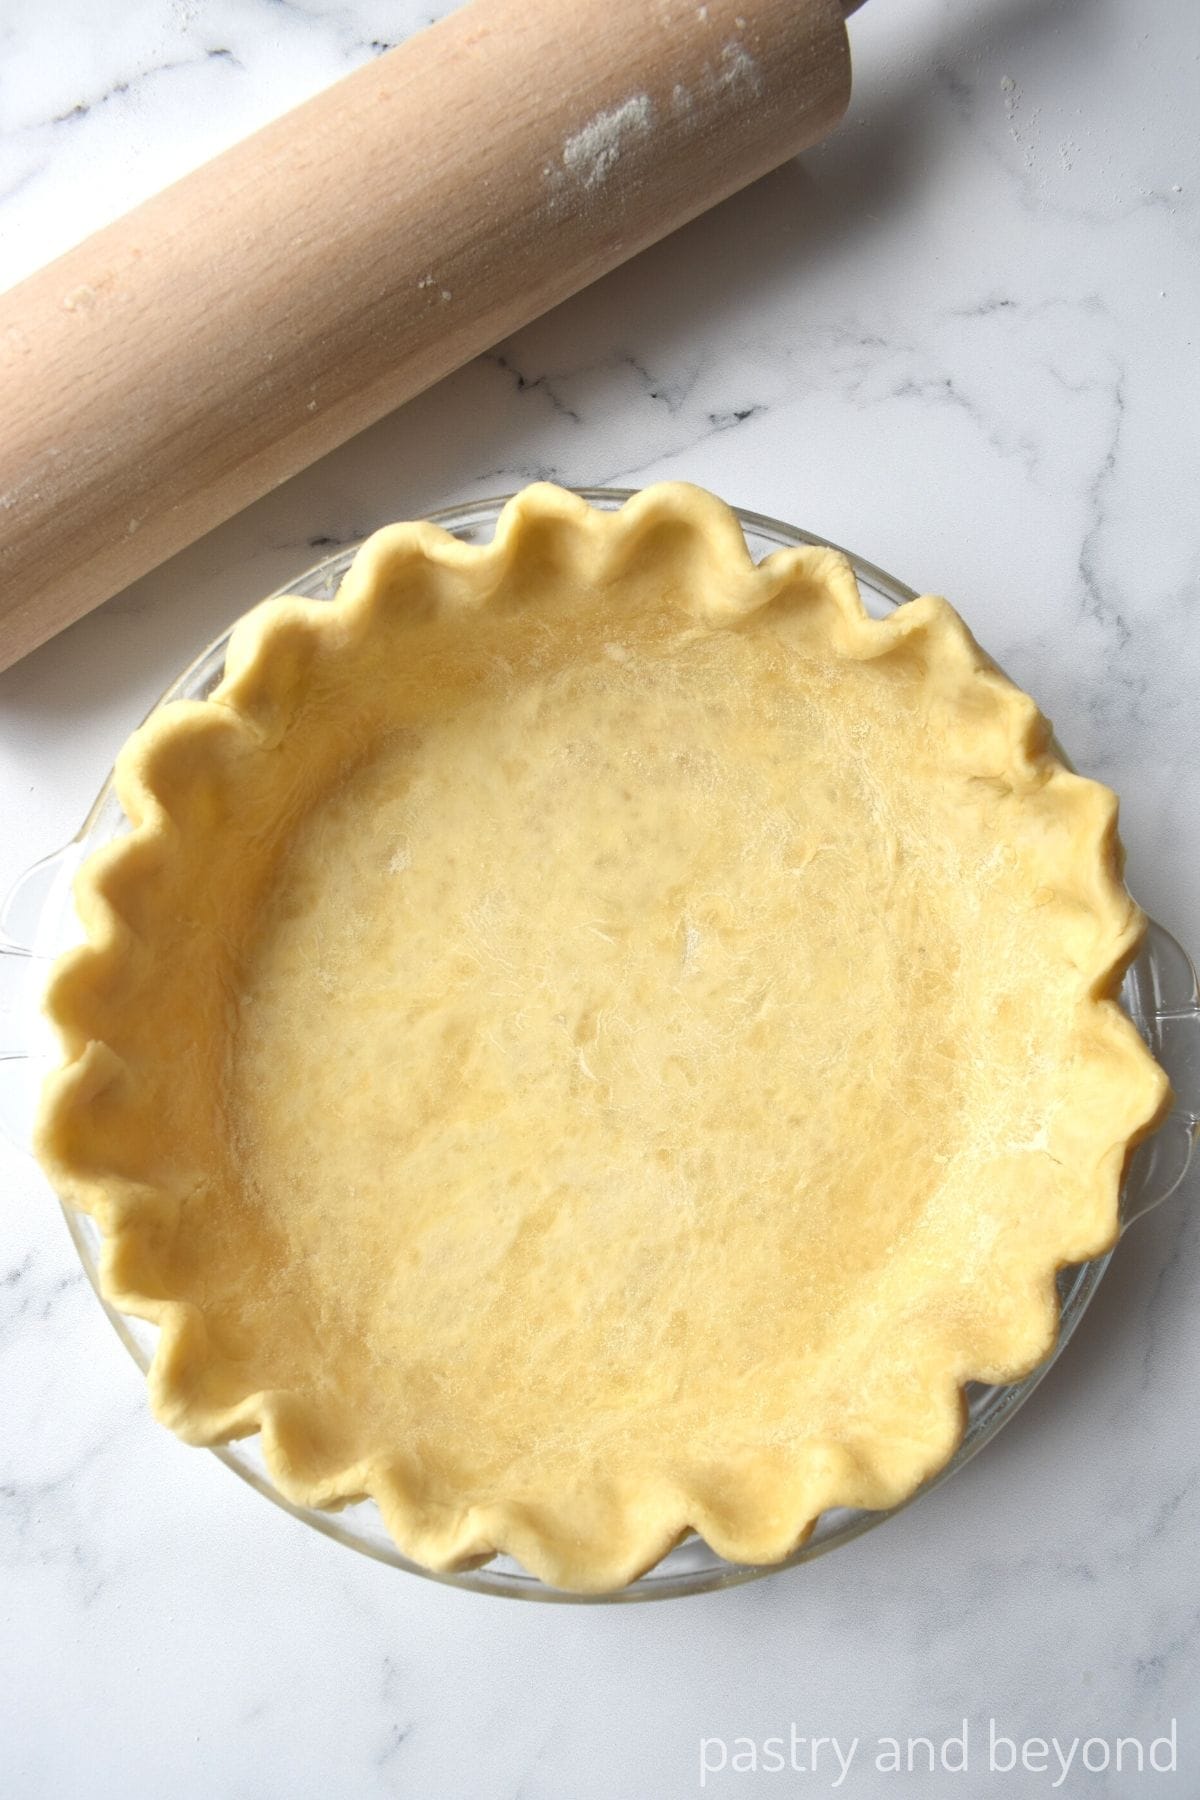
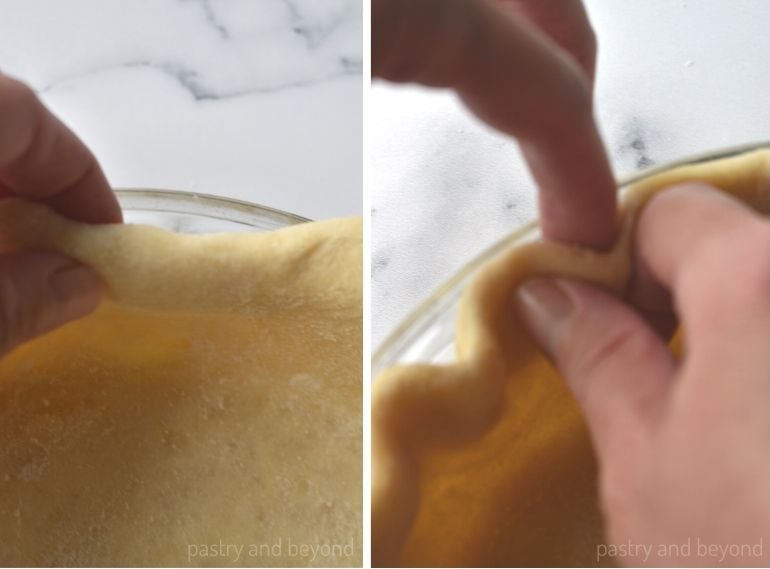
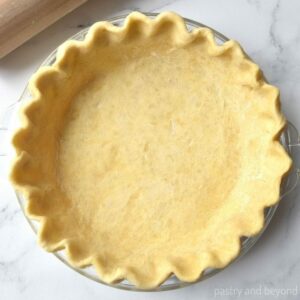
Without stretching the dough, I press it down into the pan so the dough lines the sides and the bottom.
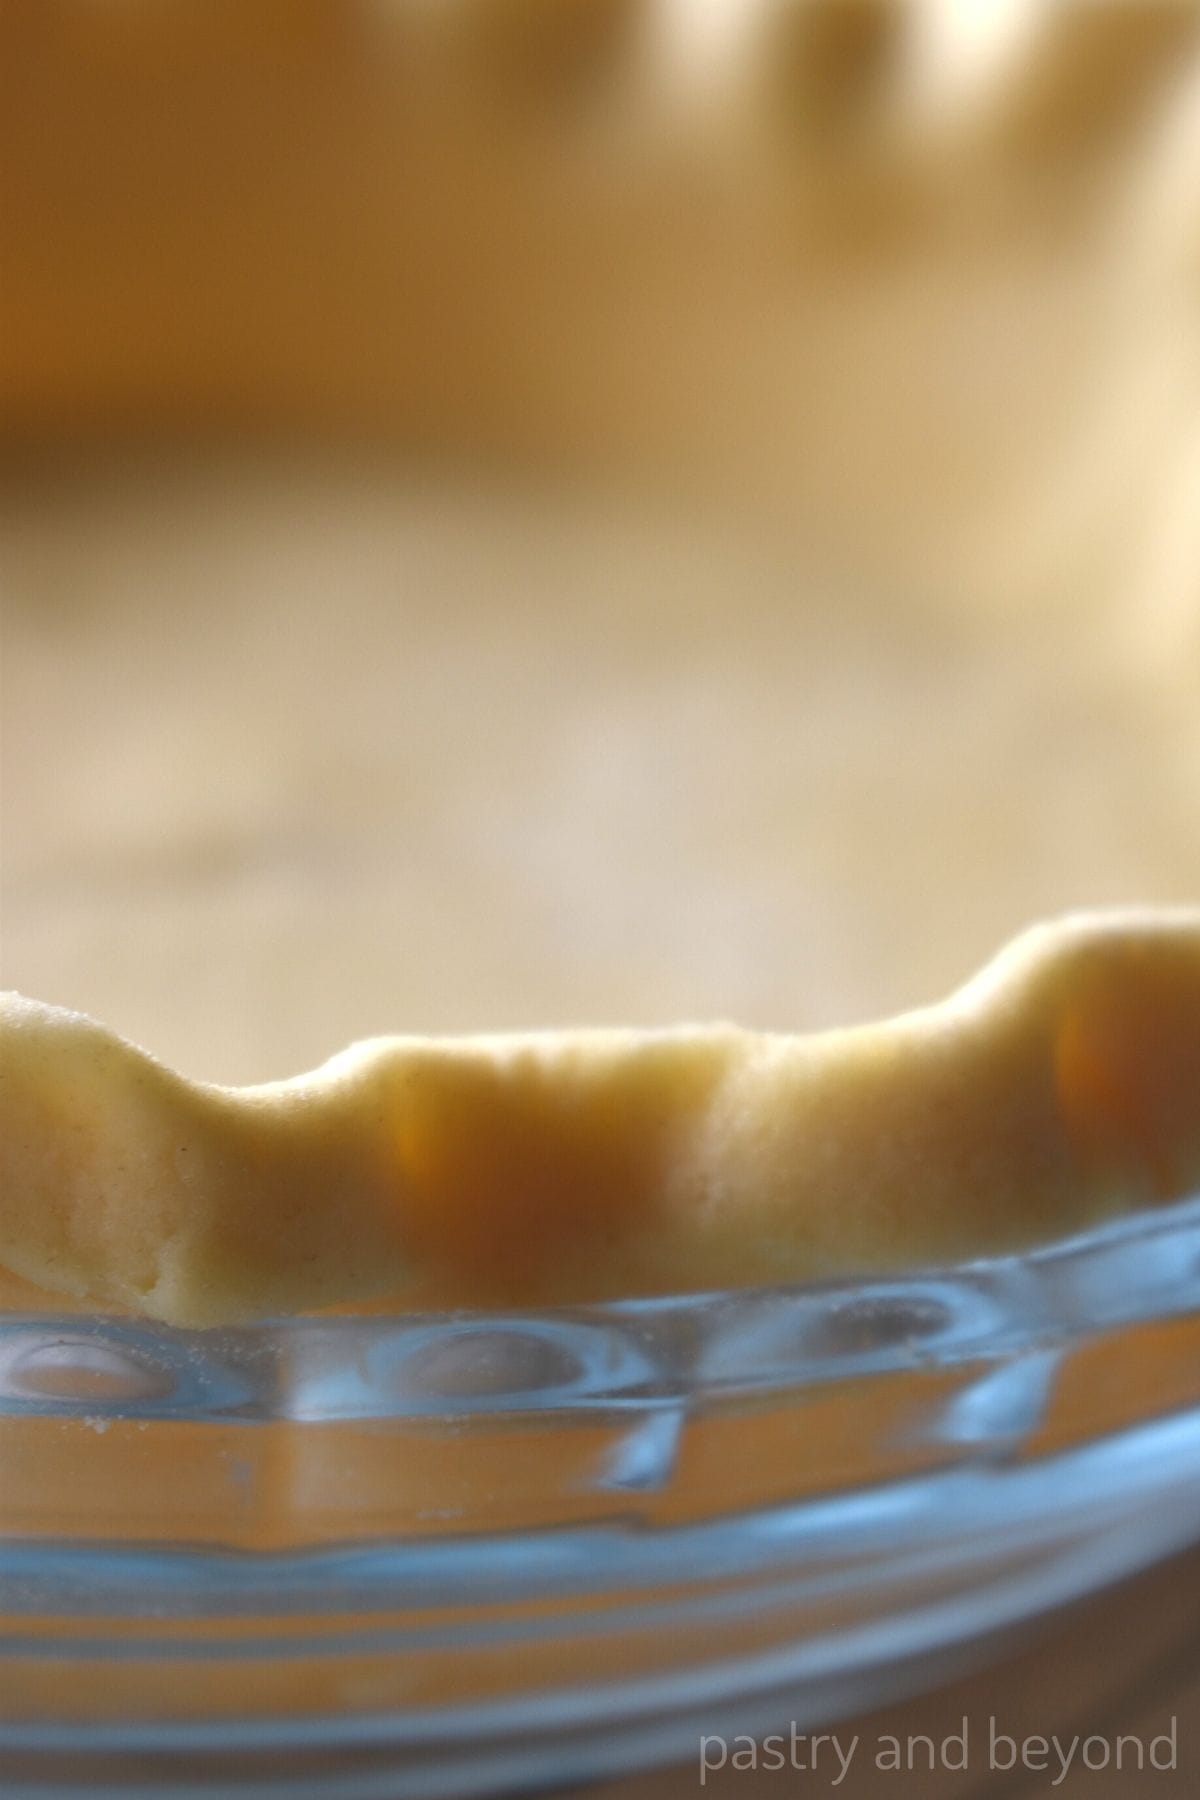
If I am making a pie with a single crust, I fold the edges underneath the dough. Then from the edges, I push the dough using my index finger and push it from the other side with my thumb and index finger to flute the edges.
If I am making a double crust and use a lattice design, I don’t flute the edges from the beginning. Let’s say I make a lattice top, I roll out the dough into an almost 12-inch circle. I cut equal 10 wide strips that are almost 1.2 inch(3 cm)wide. Then I add the filling, lattice top and fold the edges. Next, I flute the edges.
Par Baking/Blind Baking: Fully baked vs partially baked crust
If a pie recipe doesn’t bake the filling with the crust, it will ask you to blind-bake/par-bake it for the following reasons.
A recipe can ask you to fully bake the crust if the filling will be no-bake. Or a recipe can ask you partially bake the crust if a filling bakes in a short time or the filling is too liquid so you can avoid a soggy crust.
Whether you partially bake or fully bake the crust, you should keep the dough on the pie plate in the fridge for 30-45 minutes.
In each case, first, you should dock the crust with a fork and then cover the crust with parchment paper and fill it with pie weights or dry beans. These weights will weigh down the crust, as a result, the crust won’t puff and shrink too much while baking.
I bake at 375°F (190°C) for 18 minutes until the edges start to get brown for a partially baked crust. Once I removed the plate from the oven, I remove the parchment paper and weights. The crust will look a little wet. I dock the crust again and continue to bake for a few minutes until the crust is lightly golden brown.
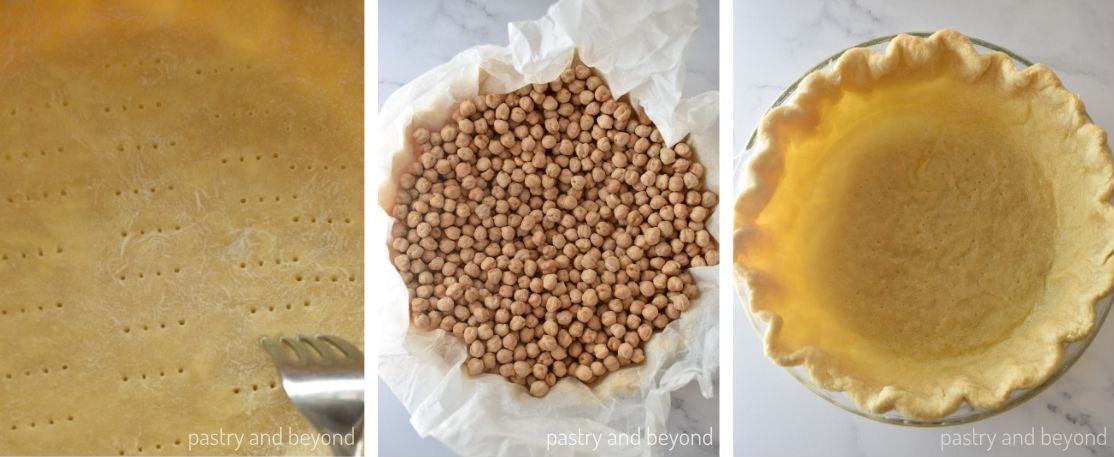
For a fully baked crust, after I remove the weights, I dock the crust with a fork again and continue to bake for extra 18 minutes or until the crust is golden brown.
You can keep the pie dough with plastic wrap in the fridge for up to 3 days. The dough will be hard to roll out if it stays in the fridge for more than 1-2 hours. You should keep it at room temperature for a couple of minutes until it comes to a rolling consistency. You can also keep the dough in the freezer for up to 3 months. Let it thaw overnight in the fridge.
I hope you find this post useful and use this pie crust recipe to make delicious pies or other pastries!
I love hearing from you! If you try this recipe or my other recipes please leave a comment and give a star rating!
Easy Pie Crust Recipe by Hand
Ingredients
- 325 grams (2 and ⅓ cups) all-purpose flour, dip and sweep
- 225 grams (1 cup) unsalted butter, cold and cut into small cubes
- ½ teaspoon salt
- ½ tablespoon granulated sugar*
- 6 to 8 tablespoons ice cold water**
- 1 tablespoon vinegar,*** cold, optional
Instructions
Pie Dough
- Place flour, salt and sugar in a large bowl and stir.
- Add the cubed butter pieces and cover the pieces with the flour mixture. This way you can cut the butter into the flour mixture easily. If you are working in a hot environment, I suggest you keep the bowl with the flour mixture and butter in the freezer for 15 minutes before cutting the butter into the flour mixture. If you have a pastry cutter, cut the butter into the flour using it as it makes the process easier. If you don't have one, you can use a fork or two forks for this process. When there are pea-size pieces you can stop. If there are some large pieces of butter, that's fine.
- Add 3 tablespoons of water and all the vinegar into the mixture and stir with a spatula. Continue to add water gradually as needed, using 1 tablespoon of water at a time. You should stop adding water when the dough is moist with lumps. It shouldn't be wet. The dough should come together easily. I usually use almost 7 and ½ tablespoons of liquid(a mixture of water+vinegar).**** Sometimes it can be 7 tablespoons, sometimes 9 tablespoons. So you should check the consistency-look for a moist but not wet dough.
- Make a ball out of the dough without overworking it. Place it on a lightly floured surface, divide the dough in half, make discs and cover them with plastic wrap.
- Keep them in the fridge for almost 1 hour before rolling them out.
Rolling out the dough for pies
- Flour the work surface, rolling pin and the dough so the dough doesn’t stick to either. As you roll the dough, give a quarter turn to the dough so it doesn’t stick to the surface.
- Roll the dough into 12 inch(30cm) circle
- Lightly flour the rolling pin and loosely roll the dough around it and gently unroll it into the 9 inch (23cm) pie plate.
- Without stretching the dough, press it down into the pan so the dough lines the sides and the bottom.
- If you are making a pie with a single crust, fold the edges underneath the dough. From the edges, push the dough using your index finger and push it from the other side with your thumb and index finger to flute the edges. If you are making a double crust pie and use a lattice design, don't flute the edges from the beginning. Roll out the dough into an almost 12-inch circle. Cut equal 10 wide strips that are almost 1.2 inch(3 cm)wide. After you add the filling, lattice top and fold the edges, you can flute.
- Whether you partially bake or fully bake***** the crust, keep the dough on the pie plate in the fridge for 30-45 minutes.
Leave a Reply